
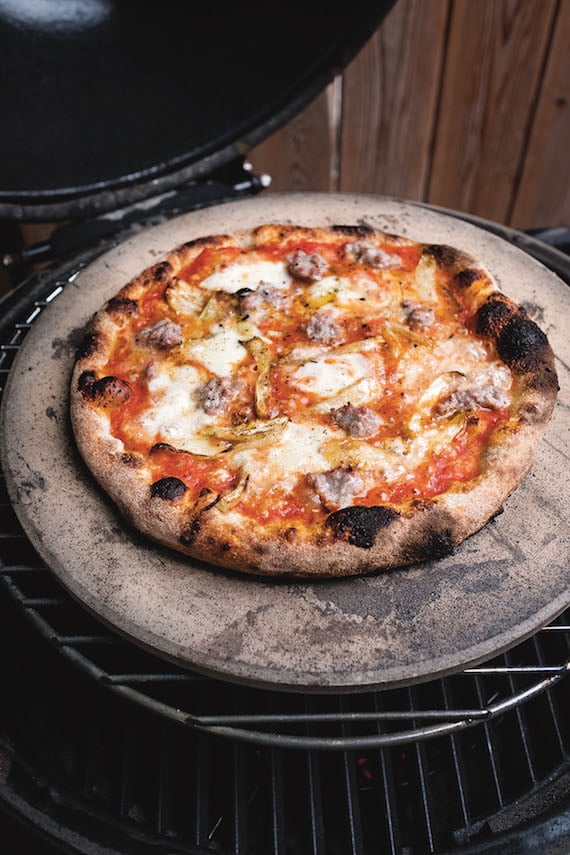
A kamado-style grill like the Big Green Egg is a superhot ceramic oven with all-around heat that can blister a pizza crust and cook the toppings simultaneously.
Kamado-style grills are modeled on the ancient Japanese kamado and the Indian tandoor. They are essentially ceramic ovens that you can also use for grilling directly over the heat source, which is typically charcoal. Big Green Egg, Primo, Broil King, and Komodo Kamado all make this type of grill. They are very fuel-efficient because ceramic retains heat so well. Once you get the grill up to temp, you don’t need to add much charcoal to maintain the temperature, so they’re pretty cheap to run. Plus, they get really hot. You can get the ambient temperature in most ceramic kamados over 700°F/371°C, similar to the temps in wood-fired pizza ovens. Modern versions of these grills are rounded or egg-shaped, which also provides those efficient rolling convection heat currents. And the ceramic lid stores up heat and sends it to the top of the pizza like the dome in a wood oven. With a ceramic baking stone in there as your cooking surface, a kamado is basically as close as you’re gonna get to a wood-fired pizza oven. It’s just smaller. One other big difference: the heat comes from below. For that reason, you need some kind of heat diffuser to redirect the heat around the pizza so it doesn’t just hit the bottom. Most heat diffusers are ceramic or metal plates that sit between the fire and the food. Most kamados come with a heat diffuser for this type of cooking, often called indirect grilling.
Once you fire it up, baking pizza in a kamado is pretty similar to baking pizza in a wood oven. You preheat the oven (with the heat diffuser and baking stone in place). Shape and top the dough, and then load the pizza onto the hot stone. One advantage here is that you don’t even need to rotate the pizza during baking because the oven disperses the heat so evenly. Plus, the grill’s dome blisters the rim of the pizza and cooks the toppings in just a few minutes.
You might be thinking, “Why not use a baking steel instead of a stone in there?” Steel holds and transfers more heat than ceramic, and more heat = crisper crust; right? Well, the temperature difference matters! Steels are great for baking at 500° to 550°F/260° to 288°C. But when you’re baking at 700° or 800°F/371° or 427°C, you’ve got a lot more heat overall, and steel is transferring all that heat to the pizza faster. It turns out that a 1/4-inch/0.6-cm -thick piece of steel in a Big Green Egg blazing away at 700°F/371°C burns the heck out of whatever you put on it. It’s like sticking a piece of steel in your raging hot wood oven. It’s overkill. When you’re baking at temperatures over 650°F/343°C, stick with a baking stone. The ceramic holds on to the heat a bit longer and delivers it more gradually to the pizza, crisping it up perfectly.
Kamado Grilled Salsiccia Pizza Recipe

Makes:
Takes:
Equipment
- Baking stone that fits your kamado
- Wooden pizza peel
- Dough scraper
Ingredients
- 1 dough ball, preferably Marc Vetri’s Naples Dough at 70% Hydration, about 270 grams (9.5 ounces)
- Flour, for dusting
- ⅓ cup Pizza Sauce
- ⅓ cup Roasted Fennel
- 2 ounces fresh mozzarella cheese, torn in bits
- 2 ounces loose, raw, Italian pork fennel sausage, torn in bits
- 1 teaspoon freshly grated Parmigiano-Reggiano cheese
- Sea salt and freshly ground black pepper
- 5 pounds hardwood lump charcoal
These recipes were created in US Customary measurements and the conversion to metric is being done by calculations. They should be accurate, but it is possible there could be an error. If you find one, please let us know in the comments at the bottom of the page
Method
- Prep. Let the dough warm up at room temperature for at least 1 hour or up to 4 hours. As it warms up, the dough will relax and become easier to shape.
- Fire up. Light the charcoal until it starts to glow red. Everyone has their favorite method. The fastest way is to use two chimney starters, each filled with 2 ½ pounds (1.1 kg) of charcoal. Place wadded-up newspaper in the bottom, charcoal in the top, and then light the paper and the perforated cans will feed the fire with oxygen so the charcoal lights quickly. Dump the glowing coals onto the coal grate of the cooker. Place the heat diffuser over the coals, then place the grill grate and/or upper rack in the cooker and a baking stone on the upper rack. A baking stone is preferred here over a baking steel. Steel tends to burn the bottom of the pizza due to the grill’s high heat and the steel’s ability to transfer heat so quickly. Close the lid and preheat the grill with the top and bottom vents open for 50 to 60 minutes. The ambient temperature (on the grill’s thermometer) should be 650° to 750° (343° to 399°C). The cooking surface temperature should be about 600°F (316°C) when checked with an infrared thermometer through the top vent (to avoid opening the grill and losing heat).
- Have your toppings ready to go.
- Shape the dough. The goal is to stretch the dough to a 10-to 12-inch (25 to 30 cm) circle with an even thickness across the middle and a thicker rim around the edge. There are lots of ways. For 70% hydration dough, you’ll need a bit more flour and a gentler hand, since the dough is softer. It’s best to shape it completely on your work surface. The dough should be soft enough to stretch while it’s flat. If you try to pick it up, it may tear a hole. Generously flour a work surface and a wooden pizza peel. Use a dough scraper to scrape the dough ball from the tray to the floured surface. Gently poke your fingers about ½ inch (1.3 cm) from the edge of the dough ball all around it to begin forming the rim. The center should look thicker, like a hat. Leave the rim alone and press your fingers and palm gently into the center of the hat, moving your fingers and thumb outward to begin stretching the dough away from the center. At this point, you should have a disk of dough about 5 inches (12 cm) in diameter. Slip one hand under the disk and quickly flip it over. Repeat the poking and pressing process on the other side, poking your fingers around the edge first to make the rim and then placing your palm on the center and gently stretching your fingers and thumb outward to stretch the dough from the center outward. As you work, gradually rotate the dough on the flour and keep your thumb against the rim to make the rim thick and round. The dough should be soft enough to continue this process until it is stretched to a 10-to 12-inch (25- to 30- cm) circle with an even thickness across the middle and a rim about ½ inch (1.3 cm) thick. If the dough tears a hole, patch it by pulling a little dough from one side of the hole and pressing it over the hole with your thumb. Lay the stretched dough onto the floured peel. The easiest way is to simply drape it over the peel and then remove your hands from beneath the dough. Reshape the dough round as necessary, keeping the rim thick. Give the peel a quick shake to make sure the dough can slide easily.
- Add the toppings. Spread the sauce on the dough in an even layer all the way to the rim. Scatter on the fennel, mozzarella, sausage, and Parmigiano, then give the peel another quick shake to make sure the dough slides easily.
- Grill the pizza. Open the grill and quickly brush or blow off any ash from the cooking surface. Quickly shake and load the pizza onto the cooking surface and close the lid. Close the top vents to trap heat and send it to the top of the pizza. Keep the bottom vents fully open to feed the fire oxygen and keep it burning hot. Cook until the rim is puffed, the dough blisters and chars in spots, and the bottom is crisp, 4 to 6 minutes. The pizza should cook evenly so there is no need to rotate it. Check the doneness by shining a light (a cell phone light works well) through the top vent to avoid opening the grill during cooking.
- Serve. Remove the pizza from the grill to a wire rack to cool for a minute or so, just to keep the steam from making the crust soggy. If you will be baking another pizza, quickly close the lid, reopen the top vents, and let the cooking surface recover its heat for 15 to 20 minutes. Transfer the pizza to a pizza pan or cutting board, slice, and sprinkle with salt and pepper. I like 6 slices for this size pizza. This article and recipe have been adapted with permission from Mastering Pizza by Marc Vetri and David Joachim (Ten Speed Press, 2018).

High quality websites are expensive to run. If you help us, we’ll pay you back bigtime with an ad-free experience and a lot of freebies!
Millions come to AmazingRibs.com every month for high quality tested recipes, tips on technique, science, mythbusting, product reviews, and inspiration. But it is expensive to run a website with more than 2,000 pages and we don’t have a big corporate partner to subsidize us.
Our most important source of sustenance is people who join our Pitmaster Club. But please don’t think of it as a donation. Members get MANY great benefits. We block all third-party ads, we give members free ebooks, magazines, interviews, webinars, more recipes, a monthly sweepstakes with prizes worth up to $2,000, discounts on products, and best of all a community of like-minded cooks free of flame wars. Click below to see all the benefits, take a free 30 day trial, and help keep this site alive.
Post comments and questions below
1) Please try the search box at the top of every page before you ask for help.
2) Try to post your question to the appropriate page.
3) Tell us everything we need to know to help such as the type of cooker and thermometer. Dial thermometers are often off by as much as 50°F so if you are not using a good digital thermometer we probably can’t help you with time and temp questions. Please read this article about thermometers.
4) If you are a member of the Pitmaster Club, your comments login is probably different.
5) Posts with links in them may not appear immediately.
Moderators